Testing an app with a screen reader means turning on VoiceOver, TalkBack, NVDA or JAWS and working through the app the way a blind user does: one focused element at a time, hearing its name, role, value and state. Start with your real user tasks, not the settings screen. A focused first pass on one flow takes about an hour.
I have watched experienced developers discover that a perfectly reasonable-looking button announces nothing at all, or that their whole booking flow becomes a dead end once speech is the only feedback channel. Neither a simulator nor an automated scanner surfaces those. Switching a reader on and doing a single task end to end does, in about the same time it takes to run one automated report.
Manual screen reader testing is one technique inside accessibility testing, not a replacement for it. It finds missing names, broken focus order, silent dynamic updates and dead ends. It does not find low contrast, small touch targets, or motor and cognitive barriers. Treat what follows as a repeatable process your team can run every sprint, and pair it with real users when you can.
Table of Contents
- What You Need
- Step-by-Step
- 1. Prepare the app and test environment
- 2. Turn on the correct screen reader
- 3. Test basic navigation and orientation
- 4. Complete real user tasks with the screen reader
- 5. Check forms, buttons, and error messages
- 6. Test dynamic content and notifications
- 7. Review media, maps, images, and custom controls
- 8. Record, reproduce, and verify fixes
- Common Mistakes
- Frequently Asked Questions
- Which screen reader should I use for testing?
- How long does a manual screen reader test take?
- Can automated tools replace manual screen reader testing?
- What should I do when announcements sound right but the user still gets lost?
- Do I need JAWS to do accessibility testing?
- How do I test an app with a screen reader when I am not disabled?
- Conclusion
What You Need
You need four things: a build you can actually reach, one screen reader on the platform your users are on, real data to interact with, and a short list of tasks someone would actually try to finish. Everything else is optional.
- A build and a test account. Not a staging link with expired credentials. Create accounts for the states you care about: a trip in progress, a permit application half-finished, a notification already read.
- Representative content. Long station names, an empty search result, a 400-character service-request description, a map with forty pins on it. Placeholder text hides most real bugs.
- A task list. Five tasks a real user would attempt, written as goals, not as screens. “Find a route from Central Station to the ferry terminal and set an alert” is a task. “Check the results page” is not.
- One reader on one platform. Start with the pair your users actually run. Adding a second platform comes after the first pass is clean, not before.
- A way to capture speech. NVDA Speech Viewer, JAWS Speech History, or the VoiceOver speech transcript panel. Without it you will argue from memory about what was said.
- A bug log with a fixed template. You will lose the reproduction without one. Step 8 covers the fields.
Pick the reader from the platform you ship to, not the one your team already has installed.
| Reader | Platform | Licence | How to switch it on | Element list command |
|---|---|---|---|---|
| VoiceOver | iOS, iPadOS, macOS | Built in | Settings > Accessibility > VoiceOver | Rotor (two-finger rotate) |
| TalkBack | Android | Built in | Settings > Accessibility > TalkBack | Reading controls menu |
| NVDA | Windows | Free, from nvaccess.org | Launch after install | NVDA + F7 |
| JAWS | Windows | Paid licence | Launch after install | Insert + F7 |
| Narrator | Windows | Built in | Windows + Ctrl + Enter | No element list; last resort for testing |
Android menu paths shift between manufacturers, so on Samsung and Xiaomi devices look under Settings > Accessibility and use the device search if the exact path is not there. Desktop paths on macOS live in System Settings > Accessibility > VoiceOver; the shortcut is Command + F5.
Step-by-Step
Eight steps, in order. Each one ends with a check you can pass or fail, because a step with no pass condition is just a suggestion.
1. Prepare the app and test environment
Fix the variables before you start. Silence notifications, close chat widgets, and switch off any second assistive technology so you hear one reader rather than two.
Install a fresh copy of the build rather than a debug build with a floating overlay. Populate it with the awkward content: a long name, an empty list, a saved item, a failed search.
Write your five tasks before you switch the reader on, and mark which ones must complete without sighted help. If a task needs you to look at the screen to decide the next step, it is a testable failure.
2. Turn on the correct screen reader
Every screen reader announces only what the platform’s accessibility layer exposes, so the reader on the platform you ship to is non-negotiable. Here are the exact paths.
iPhone and iPad: Settings > Accessibility > VoiceOver, then toggle it on. Set Accessibility Shortcut to VoiceOver so a triple-click of the side button toggles it. To switch it off, go back to the same toggle or triple-click the side button again. Leave it on too long and you will meet the grey triangle by accident.
Mac: System Settings > Accessibility > VoiceOver, or press Command + F5. Press Escape or Command + F5 again to leave it.
Android: Settings > Accessibility > TalkBack. Holding both volume keys together on many devices toggles it without opening settings. Switch it off the same way you turned it on.
Windows: Install NVDA from nvaccess.org and launch it; it starts with Windows and says its name on startup. Press NVDA + Q to exit. JAWS needs a purchased licence, and NVDA is the usual free stand-in for testing.
For a native app, make sure the reader is on before you open the app, and check the very first announcement. For a web app, test in the browser your users run: Safari on iOS, Chrome on Android, and both on desktop.
3. Test basic navigation and orientation
Move through the screen from the top and check that each stop tells you four things: what it is called, what it does, what its current value is, and what state it is in. A link that only says “click here” gives you one of the four.
On a phone, swipe right for the next element and left for the previous one. Double-tap to activate. On desktop, use Tab and Shift + Tab, and the arrow keys or H and L for headings in NVDA.
Check three things a sighted tester never would: whether the app announces its own name when it opens, whether the first element you reach is the main content rather than a cookie banner, and whether you can get back to where you were after opening a detail screen. Headings and landmarks are how users skim; most screen reader users move by heading rather than by reading linearly.
Use the element list to jump straight to a heading and see whether the hierarchy makes sense out of context: a level 3 before any level 2 usually means the structure is decorative rather than real.
4. Complete real user tasks with the screen reader
Run your task list end to end, hands off the screen. For civic and mobility apps the common ones are finding a transit route, reporting a pothole, booking a permit slot, reading an air-quality alert, and changing notification settings.
For each task, note the moment you lost the thread. That moment is the defect. Typically it is one of: a screen change with no announcement, a loading spinner nobody speaks, a back action that returns you to a list with no idea what changed, or a button whose label changed with no state change announced.
Time each task and count how many times you had to swipe back to work out where you were. Two minutes of backtracking on a booking flow is a real barrier even when every individual announcement was technically correct.
5. Check forms, buttons, and error messages
Every input needs a name, an input type, whether it is required, and any format instruction, all available before you start typing. Placeholder text is not a label: it disappears the moment you type, and screen readers often skip it entirely.
Test the way you would as a user: tab into an empty required field, submit, and listen for what happens. You should hear the field name, the word required, the reason it failed, and where to go next. If the error only turns the border red, you have found a blocker.
Also check selection state. A custom dropdown or combobox must announce expanded or collapsed, the current option, and the number of options. A checkbox must announce checked. Nothing should trap you: Tab and Escape should always get you out.
6. Test dynamic content and notifications
Everything that changes without a page load has to speak up. Route results finishing, an alert arriving, a modal opening, a toast confirming a submission: each one needs an announcement and, where it takes over, a focus move.
Two levels matter here. A polite region waits for a pause and is right for results counts and status text. An assertive region interrupts and is right for errors and time-sensitive alerts. Using assertive for routine updates trains people to switch the reader off.
Watch for the double-read that people ask about constantly: a status change announced once politely and once again because the app also moved focus. Pick one mechanism. Also check that a map result or a delayed service alert is spoken as text, since there is no visual cue to fall back on.
7. Review media, maps, images, and custom controls
A map has to give a text alternative that carries the information a sighted user reads off the pins, not the word “map”. The same applies to charts, status icons, diagrams and photographs. An icon-only control needs a name; a decorative one needs to be hidden from the reader rather than read as noise.
For audio and video, check that captions or a transcript are reachable and labelled, and that the player controls are named and operable. Any custom swipe gesture needs a keyboard or button equivalent, because a precise gesture is not available to everyone who uses a reader.
Compare the visual order against the focus order. On a two-column civic dashboard the reading order should follow the columns, not jump between them row by row. That mismatch is the single most common native app finding I see.
8. Record, reproduce, and verify fixes
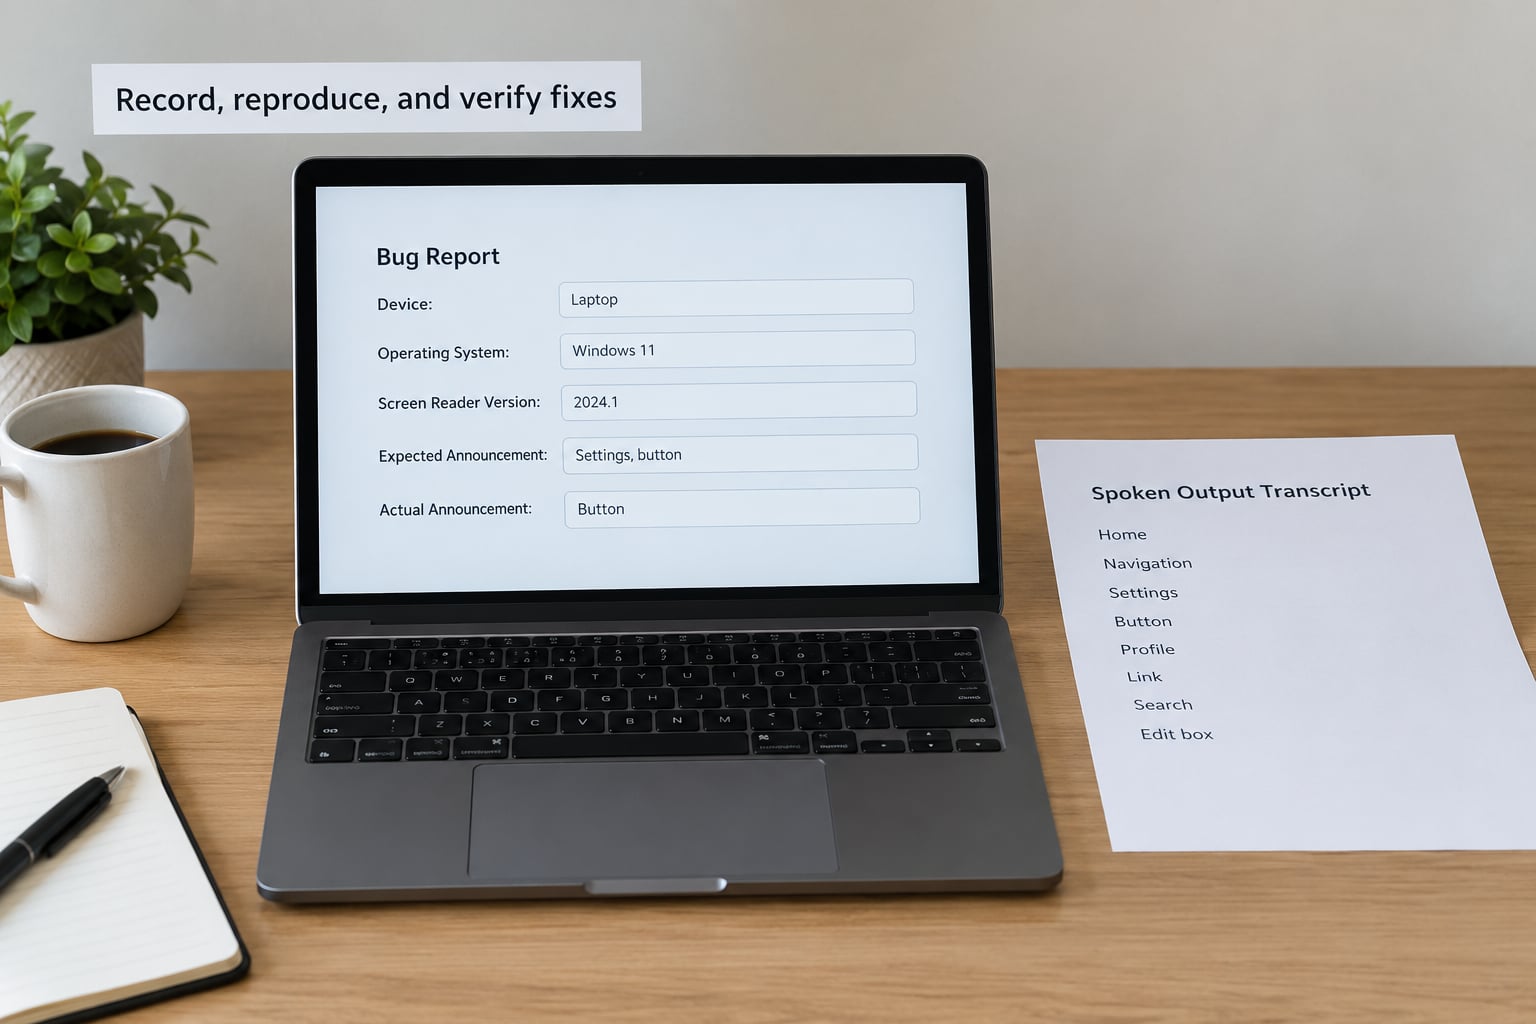
A screen reader bug that cannot be reproduced cannot be fixed. Log each finding with the device and model, the operating system version, the reader and its version, the build number, the browser if it is web, the exact steps, the announcement you heard, the announcement you expected, and a severity rating.
Paste the transcript from Speech Viewer or the speech history panel straight into the ticket. Reading “the button is unreadable” and reading “button, no name, at position 7” are two very different tickets, and only one of them gets fixed in the same sprint.
Rate severity by whether a user can complete the task at all: blocked, workaround only, or confusing. Then re-run the exact same steps on the fixed build and record the new transcript, including on the second platform. A fix verified once on iOS is not a fix until Android behaves too.
Common Mistakes
These come up in almost every accessibility testing thread, and each one costs a team a full day of false bugs.
- Testing one platform only. VoiceOver and TalkBack expose different platform layers and different naming quirks. A build that reads cleanly on iOS can announce nothing on Android.
- Trusting the reader over the source. When an announcement seems wrong, check the accessibility tree or the inspector before filing it. A custom widget built on a div has no role to announce, and no reader can rescue that.
- Skipping touch and keyboard. Many testers swipe through the app while the reader is on and never open the keyboard or the element list, which hides broken focus order entirely.
- Accepting vague labels. “Button”, “Edit”, or reading the icon glyph means the control has no name. Reject it rather than noting it as minor.
- Treating a correct but unusual announcement as a bug. Verbose punctuation reads, braille output starting, or a price read as a sentence are normal behaviour. Log the actual string rather than your impression of it.
- Never retesting. Fixes land weeks later against a build that has moved on. Put the reproduction steps in the ticket so anyone can re-run them.
- Calling an automated scan a pass. axe and Lighthouse catch a fraction of issues. A clean scan with an untested flow is an untested flow.
- Forgetting to switch the reader back off. This one bites on shared machines. Know the exit command for the platform before you start, not after.
Frequently Asked Questions
Which screen reader should I use for testing?
Use the reader your users are actually running. Windows: NVDA, free from nvaccess.org, or JAWS if your support team hears from JAWS users. Apple: VoiceOver, built into every iPhone, iPad and Mac. Android: TalkBack, built in and reached through Settings, Accessibility. JAWS is not required, but if your customer support tickets mention it, add it as a second pass rather than a first choice.
How long does a manual screen reader test take?
A first pass on one flow takes roughly an hour once you can move through the screen without fighting the reader. The first session with a reader is slower, often two to three hours, because you are learning it as much as testing with it. Testing three or four flows on two platforms is a realistic half-day. Record and replay rather than re-explaining what you did each time.
Can automated tools replace manual screen reader testing?
No. Automated tools catch roughly a third to a half of accessibility issues, and they never tell you whether an experience makes sense, whether announcements arrive at the right moment, or whether a user can escape a custom widget. Run axe or Accessibility Insights in your build for regression coverage, then still do the manual pass on every task that matters to the service you run.
What should I do when announcements sound right but the user still gets lost?
That is a structure problem, not an announcement problem. Re-run the flow while listening only for focus movement, not words. Check whether headings and landmarks let you jump, whether the focus order matches the visual order, whether a screen change resets focus somewhere sensible, and whether you can tell which screen you are on without swiping back. Users get lost exactly when every element is named correctly and nothing says where they are.
Do I need JAWS to do accessibility testing?
No, and most teams should not buy it. NVDA is free, widely used, and its Speech Viewer gives you a transcript that makes bug reports reproducible. JAWS matters when you support JAWS users daily, and then it is worth a licence. Testing on JAWS after your JAWS problems are fixed is a better use of the money than testing on JAWS during initial development.
How do I test an app with a screen reader when I am not disabled?
Turn the reader on and use it. You are not simulating disability, you are exercising the same code path your users exercise and hearing the same output they hear. Set speech to a slower rate, turn on the focus indicator so you can see where you are, and read the announcements from the transcript rather than trying to follow speech live. Your value is catching what is missing, not judging the experience.
Conclusion
Pick one representative task this week, run it on the platform your users are on, and record the transcript at every step. Whatever it exposes, fix the semantics rather than the label: a proper heading, a named control, a live region on the right container.
Then repeat the same task on the second platform, because a fix verified once is a fix verified once. Pair each manual pass with an automated scan so regressions get caught in the build rather than at the next review.